Archive for November, 2007

Gibson RD Standard Bass – refinish & T-bird-i-fication

Wednesday, November 28th, 2007

A project that perhaps some Gibson purists will frown upon, but the goal is to take somewhat abused Gibson RD bass and give it a bit of a makeover – borrowing the color scheme from 1960’s Thunderbirds and hardware from more recent ‘birds.

The RD is in good cosmetic shape, however it has suffered a serious decapitation (as opposed to a mild decapitation ? “its only a flesh wound”??) in the past and slightly glue-heavy repair – which nonetheless does appear very solid. I am considering regluing it, but only if there some sign of weakness or the headstock angle is off (doesn’t appear to be). The frets also appear to have been leveled with a belt sander or other inappropriately industrial grinding instrument – and are really ground down to nothing in some spots – so the neck will require a complete refret.

OK – “purists” – get ready to cringe.

The plan is to defret the neck, make sure the board is level, and refret it. The body will be sanded down – leaving the clear finish as a sealer coat. The body will be routed for a pair of Thunderbird pickups (black), and then the entire instrument, except for the fretboard and face of the headstock, will be painted Ember Red – a little used custom color from Gibson’s colorful mid and late 60s. Ember Red is similar to Fender’s Fiesta Red, but with a stronger, deeper red tint as opposed to Fender’s more salmon tint. I have only seen the color in a few pictures of instruments ( an SG and I want to say a Melodymaker ?), but it was an option available for an additional $25 around 1966. The color is actually a 1958 Edsel color.

A new pickguard will also be cut – we haven’t discussed yet whether it should be three-ply white or black – white would look more 60s.

Anyway – feel free to verbally accost me – but I’m doing it regardless !! And .. I will have enough Ember Red left for a few more paint jobs afterward – my ’66 NR T-bird is considering getting in line for that …. maybe someone wants their BachBird in Ember Red too … ????

Might it end up looking a little like this bass ….. which appears to be something like .. Ember Red …

I have heard that the RD Bass was inspired by Entwistle to some degree – but that he hated what Gibson came up with.

G&L ASAT Bass Refinish

Wednesday, November 7th, 2007

Ok some of you may wince, because this bass had a very nicely done factory cherry sunburst finish when I started on it, but the owner simply didn’t like it and wanted something brighter and louder and more … ORANGE !!!

This is a very cool bass – sort of a Telecaster body, but hollow – used on a full-scale bass. Very lightweight and balanced. May have to shop for one of these – the only G&L I have is a 1983 L-1000, which is built like a tank, but unfortunately weighs as much one too!

This bass was finished with a relatively thin polyurethane finish. The owner and I agreed that I’d leave the majority of the old finish on the bass, and then prime over it, before applying a candy apple orange finish. This is the same as the classic candy apple red finish, which combines a silver or gold metallic undercoat with a transparent red overcoat, except that in this case the overcoat is more like the transparent orange used on a Gretsch 6120.

Here is the bass before .. yes yes .. very pretty.

The bass was disassembled and then sanded with a random orbital sander and sanding pad – mostly to rough up the finish enough for primer to adhere well. The bass was sprayed with flat white nitro primer – then wet sanded again before being ready for the silver undercoat.

The silver undercoat consists of clear gloss nitro lacquer, with fine “Brilliant Aluminum” powder stirred into it – the powder is tiny flat metal flakes that are suspended in the clear nitro. A similar approach is used to do the classic Gibson “gold top” finish, except powdered bronze flakes are used. The picture below shows the body and headstock after the initial layer of silver undercoat.

Once the silver coat was wetsanded and a second layer applied, the guitar was ready for the tinted “candy” coat.

Since its easy to add color, but impossible to take it away once sprayed, I started off with a very lightly tinted mix of clear nitro, lemon yellow dye and cherry red dye, and sprayed several light coats over the guitar. The color wasn’t very strong and the guitar took on a distinctly GOLD look !

I decided at this point that maybe there was too much yellow in the mix – or too much green in the lemon yellow – or something just not ORANGE about the color, so I went to Rockler’s and bought a bottle of “orange” dye. I mixed this again into clear gloss nitro, and after test spraying a silver painted piece of wood, I started spraying the G&L again. And this time there was no question – this bass was going to be ORANGE!!

The color is tricky to capture with a flash – the silver undercoat reflects strangely through the topcoat, but the first blurry picture gives a better impression of how orange the bass now is. Better pics will be coming tomorrow.

(Update  11/17/07)

Finished up with the bass – and I really like how it looks !  Hopefully the customer will too!

After the pictures above, I applied several nice wet clear coats – to build up the depth of the color and protect the candy orange color.  Then some good old wet sanding with 800 and 1000 grit paper, followed by compounding and hand buffing and “viola” – a nice metallic orange finish.

I applied the replacement headstock decal that G&L was kind enough to send – using a decal setting solution (aka white vinegar) and then once it was patted dry and in place, a decal softner to really get it attached to the finish.  The next day I did a two light mist coats of the headstock with gloss acrylic lacquer – when those were dry, I did a heavier coat to really gloss the headstock and protect the decal.

After wiring up the bass – plugged it in for a little bit – very cool bass, I really must keep my eye open for one of these – would look pretty cool in Fiesta Red with white plastic pickup covers ??

1965 Gibson Heritage Acoustic top refin

Tuesday, November 6th, 2007

Unfortunately I didnt think to take an actual “before” picture of this instrument, but this guitar had been modified to play left handed with a new bridge, had gold Grover tuners installed, had the headstock stripped and unfortunately had the top stripped, stained and then refinished in what appeared to be shellac with a brush.  Do not do this to your vintage Gibson acoustics !!!

The shellac refin was an orangey-brown color – dark enough that the beautiful tortoise-shell binding used on these guitars was hardly visible. The challenge was to try to refinish the top and lighten it up as close to what an aged natural finish on spruce would have looked like.

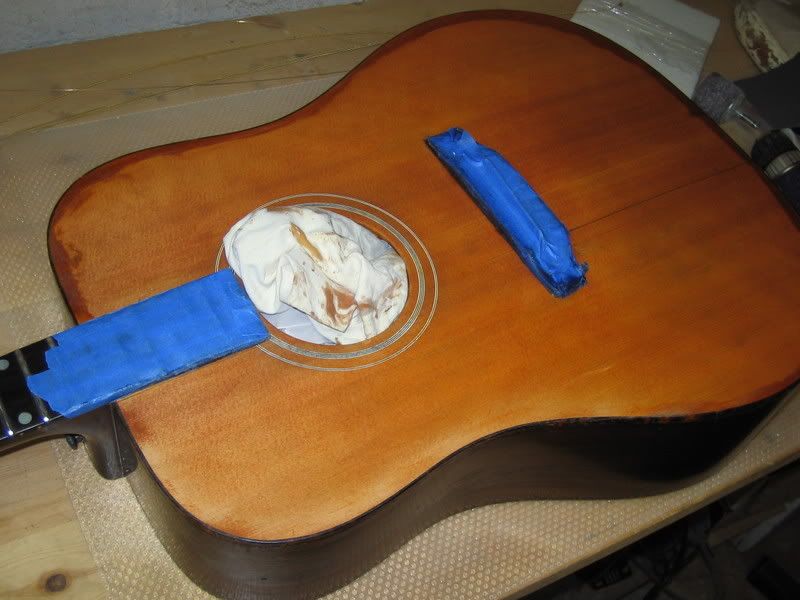
The inital step was to remove the shellac finish – I initially worked in a small area, just using acetone and a rag, and the finish did soften and start to come off, but this was going to take too long and I wouldn’ty be able to use the acetone near the bindings on edges and the soundhole anyway, as it would dissolve them.  So I used a milder type of finish stripper, called Citrix, which is somehow made from oranges (?) and will dissolve many finishes without attacking plastic bindings.  It will not work on “plastic” finishes however, such as polyurethane or polyester (think Squier Strat).  I stuffed the soundhole with newspaper and paper towel to keep everything out of the guitar.   This picture is after the first round of stripping, with the edges still left largely unstripped (note the color on the edges) and no sanding yet.

The top was finally completely stripped of shellac, but it was obvious that the top had been stained prior to being refinished. My hope was that the stain hadn’t penetrated very far, and that by carefully sanding the top I could remove a thin, thin layer of wood and the stain.  Obviously, I didn’t want to effectively thin down the top, as the top is the primary contributor to an acoustic guitar’s sound – as well as being structurally critical.  After sanding and wiping down with denatured alcohol, this is what the top looked like – much better, but not bare wood.

I also sanded the finish that had been allowed to run onto the edge binding – notice how you can really start to see the tortoise shell now !

After confering with the owner, I decided to attempt to bleach the top to see if more of the stain would come off and also to even out the color of the top.  After looking online, it appeared that there were three approaches to bleaching wood: oxalic acid, a peroxide solution and good old chlorine bleach.  Each approach works on different types of stains – for example, oxalic acid is good for rust stains – bleach was the only approach that was identified as possibly working on dye stain.  I was a bit hesitant to try the bleaching, out of fear of warping the top, but as I said, I conferred with the owner and gave it a shot.  I brushed the bleach on, undiluted, and let it sit for approximately 8 hours before sponging and toweling off the top repeatedly with clean cool water.

The net result – well – maybe it lightened it up a bit, but nothing really dramatic (the top is wet in the picture above).  I don’t think I’d try this approach again – as its risky with a non-solid body instrument, and I think that most wood dyes are not bleachable – they are designed to last !!

So then, the top was ready for a new finish – after some more fine sanding to remove any grain that had been raised by the water in the bleach and the rinsing process.  I used a gloss nitro that had a bit of a natural amber tint – and sprayed on several good heavy coats.

Note that the finish was still a bit uneven due to the stain having penetrated deeper into the wood in some areas – and not at all on one end of the bridge because glue from the new bridge had sealed the grain.  If you are going to stain your natural vintage guitar, do me a favor and first spray a nice thin coat of clear over the whole thing, and then in 10 years when you want me to refinish it natural, it will be a lot easier !!

What I did to even out the finish definitely falls into the category of “art” as opposed to “science” – I took a rag and some Minwax cherry stain (left over from doing doors in my house) – rubbed the rag on a scrap piece of wood to get most of the stain off – and the gently rubbed the lighter areas with the rag – so that just a little bit of the cherry stain (an orangey brown color actually) rubbed onto the new lacquer finish.  I was able to even out the top using this approach, without darkening the overall top.  I then sprayed a few more coats of clear onto the top, before wet sanding the entire top and hand buffing it.  I wasnt going for a mirror gloss finish – the overall finish is quite thin as it should be – primarily there to protect the wood and still show off the grain.

I resprayed the headstock gloss black and applied a headstock logo the owner had – the end result, while not looking like an unmolested Gibson Heritage should look, looked much better than it had. I also lightly wet sanded areas of the rosewood sides and back that had been scuffed up or had remnants of shellac on them and then buffed them out to reveal the amazing wood.

Squier Strat Quickie Paint Job

Monday, November 5th, 2007

A customer acquired Squier of indeterminate vintage, for free I believe, and decided they wanted to “spiff” it up without spending a lot. Since the Squier had the typical poly urethane/polyester bowling ball finish and it was a heavy plywood body, we agreed that I’d leave the original finish underneath a new dark blue metallic finish. I am also installing a Dimarzio Humbucker in place of the stock Squier bridge humbucker.

The first step was to disassemble the guitar and rough up the original black finish to give the new finish something to grip onto. I used a random orbital sander with a 100 grit pad for the front and back, and 220 grit wet and dry paper for the contours and edges. I then wet sanded the front and back with a block and 220 paper. This is what the body looked like after that:

I then sprayed the body with a good heavy coat of Camger flat white nitro primer – which not only gives a good surface for the color coat but also helps fill in small scratches in the under coat.

Once the primer dried a few hours, I wet sanded it to smooth out the body, with 320 grit wet and dry paper. This removed some of the primer coat but not enough to warrant a second primer coat, especially since the body looked quite good. For the color coat, I used a can of Duplicolor acrylic lacquer in “Dark Blue”, which is a dark metallic blue. I first just lightly coated the edges and then the front and back – and set the body aside for 15 minutes to let the solvent flash off.

Then over the next half hour I built up heavier coats of color until I had complete coverage on all surfaces. This is the body drying after the initial color coat – looks pretty good already !!

Once this coat dries – I plan on wet sanding the body with 400 and 800 grit paper – and then applying one more color coat if there are any sand throughs. If there aren’t, then I will move right to clear coats – I’ll probably put at least 3 or 4 clear coats on, before a final wet sanding, compounding and buffing out.